Linux SPI 的使用
| 更新时间 | 负责人 | 内容 | 备注 |
|---|---|---|---|
| 2022年1月4日 | Rui | 初次编写文档 | --- |
| 2022年1月8日 | Rui | 修改文档的编写方式 | 使用 Jupyter notebook 进行编写文档 |
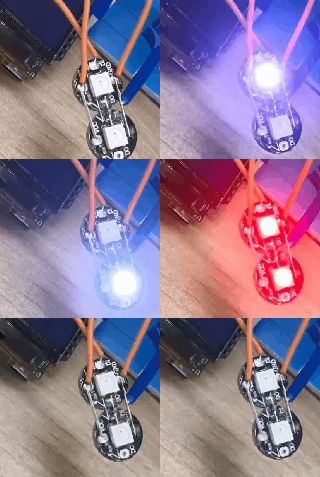
| 2022年1月18日 | Rui | 修改文档,增加效果图 | 外设文档通过测试的平台有 MaixII-Dock,使用的是 MaixPy3 0.4.0 |
使用教程
在 Linux 系统中,SPI 是以设备的形式存在(/dev/spidevX.X),所使用的方式和原来的单片机方式有所不同。下面以 MaixII-Dock 为例子,来简单的简述一下如何使用 SPI。
准备
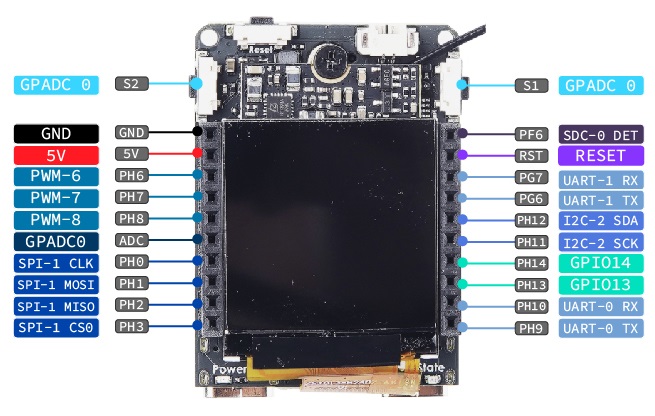
通过查看开发板的管脚定义图,确定自己使用的 SPI 通道序号,片选序号。
开始

以 MaixII-Dock 为例。查看 MaixII-Dock 管脚图,只引出了一个 SPI 通道,使用的是 SPI-1,片选0。使用代码为
In [1]:
from maix import spi
spi = spi.SpiDev()
spi.open(1, 0)
spi.bits_per_word = 8
spi.max_speed_hz = 1
spi.mode = 0b11
import time
for i in range(3):
  time.sleep(0.1)
  to_send = [0x01, 0x02, 0x01]
  print(spi.xfer2(to_send, 800000))
[ rpyc-kernel ]( running at Mon Jan 17 17:13:45 2022 )
[1, 2, 1]
[1, 2, 1]
[1, 2, 1]
In [1]:
import time

def write2812_numpy4(spi,data):
    import numpy
    #print spi
    d=numpy.array(data).ravel()
    tx=numpy.zeros(len(d)*4, dtype=numpy.uint8)
    for ibit in range(4):
        #print ibit
        #print ((d>>(2*ibit))&1), ((d>>(2*ibit+1))&1)
        tx[3-ibit::4]=((d>>(2*ibit+1))&1)*0x60 + ((d>>(2*ibit+0))&1)*0x06 +  0x88
    spi.xfer(tx.tolist()*2, int(4/1.25e-6)) #works, on Zero (initially didn't?)

def write2812_pylist4(spi, data):
    tx=[]
    for rgb in data:
        for byte in rgb:
            for ibit in range(3,-1,-1):
                #print ibit, byte, ((byte>>(2*ibit+1))&1), ((byte>>(2*ibit+0))&1), [hex(v) for v in tx]
                tx.append(((byte>>(2*ibit+1))&1)*0x60 +
                          ((byte>>(2*ibit+0))&1)*0x06 +
                          0x88)
    print([hex(v) for v in tx])
    tx[0] = 0b1000000 # spi need clear head high level
    tx.append(0b1000000) # spi need clear end high level
    spi.xfer(tx, int(4/1.05e-6))

write2812=write2812_pylist4

from maix import spi
spi = spi.SpiDev()
spi.open(1, 0)
spi.mode = 3
spi.bits_per_word = 8
spi.max_speed_hz = 20000000

write2812(spi, [[127,127,127], [0,0,0]])
time.sleep(0.5)
write2812(spi, [[0,0,0], [0,0,0]])
time.sleep(0.5)

write2812(spi, [[0,0,0], [127,127,127]])
time.sleep(0.5)
write2812(spi, [[0,0,0], [0,0,0]])
time.sleep(0.5)

# # red
write2812(spi, [[0,127,0], [0,127,0]])
time.sleep(0.2)
write2812(spi, [[0,0,0], [0,0,0]])
time.sleep(0.2)

# # green
write2812(spi, [[127,0,0], [127,0,0]])
time.sleep(0.2)
write2812(spi, [[0,0,0], [0,0,0]])
time.sleep(0.2)

# blue
write2812(spi, [[0,0,127], [0,0,127]])
time.sleep(0.2)
write2812(spi, [[0,0,0], [0,0,0]])
time.sleep(0.2)

write2812(spi, [[10,10,10], [10,10,10]])
time.sleep(0.2)
write2812(spi, [[0,0,0], [0,0,0]])
time.sleep(0.2)
[dls][ rpyc-kernel ]( running at Tue Dec 20 11:22:22 2022 )
['0x8e', '0xee', '0xee', '0xee', '0x8e', '0xee', '0xee', '0xee', '0x8e', '0xee', '0xee', '0xee', '0x88', '0x88', '0x88', '0x88', '0x88', '0x88', '0x88', '0x88', '0x88', '0x88', '0x88', '0x88']
['0x88', '0x88', '0x88', '0x88', '0x88', '0x88', '0x88', '0x88', '0x88', '0x88', '0x88', '0x88', '0x88', '0x88', '0x88', '0x88', '0x88', '0x88', '0x88', '0x88', '0x88', '0x88', '0x88', '0x88']
['0x88', '0x88', '0x88', '0x88', '0x88', '0x88', '0x88', '0x88', '0x88', '0x88', '0x88', '0x88', '0x8e', '0xee', '0xee', '0xee', '0x8e', '0xee', '0xee', '0xee', '0x8e', '0xee', '0xee', '0xee']
['0x88', '0x88', '0x88', '0x88', '0x88', '0x88', '0x88', '0x88', '0x88', '0x88', '0x88', '0x88', '0x88', '0x88', '0x88', '0x88', '0x88', '0x88', '0x88', '0x88', '0x88', '0x88', '0x88', '0x88']
['0x88', '0x88', '0x88', '0x88', '0x8e', '0xee', '0xee', '0xee', '0x88', '0x88', '0x88', '0x88', '0x88', '0x88', '0x88', '0x88', '0x8e', '0xee', '0xee', '0xee', '0x88', '0x88', '0x88', '0x88']
['0x88', '0x88', '0x88', '0x88', '0x88', '0x88', '0x88', '0x88', '0x88', '0x88', '0x88', '0x88', '0x88', '0x88', '0x88', '0x88', '0x88', '0x88', '0x88', '0x88', '0x88', '0x88', '0x88', '0x88']
['0x8e', '0xee', '0xee', '0xee', '0x88', '0x88', '0x88', '0x88', '0x88', '0x88', '0x88', '0x88', '0x8e', '0xee', '0xee', '0xee', '0x88', '0x88', '0x88', '0x88', '0x88', '0x88', '0x88', '0x88']
['0x88', '0x88', '0x88', '0x88', '0x88', '0x88', '0x88', '0x88', '0x88', '0x88', '0x88', '0x88', '0x88', '0x88', '0x88', '0x88', '0x88', '0x88', '0x88', '0x88', '0x88', '0x88', '0x88', '0x88']
['0x88', '0x88', '0x88', '0x88', '0x88', '0x88', '0x88', '0x88', '0x8e', '0xee', '0xee', '0xee', '0x88', '0x88', '0x88', '0x88', '0x88', '0x88', '0x88', '0x88', '0x8e', '0xee', '0xee', '0xee']
['0x88', '0x88', '0x88', '0x88', '0x88', '0x88', '0x88', '0x88', '0x88', '0x88', '0x88', '0x88', '0x88', '0x88', '0x88', '0x88', '0x88', '0x88', '0x88', '0x88', '0x88', '0x88', '0x88', '0x88']
['0x88', '0x88', '0xe8', '0xe8', '0x88', '0x88', '0xe8', '0xe8', '0x88', '0x88', '0xe8', '0xe8', '0x88', '0x88', '0xe8', '0xe8', '0x88', '0x88', '0xe8', '0xe8', '0x88', '0x88', '0xe8', '0xe8']
['0x88', '0x88', '0x88', '0x88', '0x88', '0x88', '0x88', '0x88', '0x88', '0x88', '0x88', '0x88', '0x88', '0x88', '0x88', '0x88', '0x88', '0x88', '0x88', '0x88', '0x88', '0x88', '0x88', '0x88']
了解更多
SPI 通信协议的原理
关于 MaixII-Dock SPI 更多详情可以查看大佬鼠的博文为 AW V831 配置 spidev 模块,使用 py-spidev 进行用户层的 SPI 通信。


 Translate

