

MaixPy3 基本使用示例
| 更新时间 | 负责人 | 内容 | 备注 |
|---|---|---|---|
| 2022年1月4日 | dianjixz | 初次编写文档 | --- |
| 2022年1月18日 | dianjixz | 修订文档文档 | 使用 Jupyter notebook 进行编写文档 |
| 2022年3月22日 | rui | 修改部分表述错误 | ---- |
| 2022年5月7日 | dls | 增加更多常用 API 说明 | ---- |
| 2022年5月11日 | dls | 0.4.8 后 image.new 取代 image.Image().new | 支持 new load open 接口 |
| 2022年5月25日 | dls | 0.4.9 后 加入了 opencv 的 Canny 、 flip, tobytes 支持导出 jpg bmp png 等数据,修复了 RGB 贴图透明度混合 | |
| 2022年5月31日 | dls | 0.5.0 后 找色的 LAB 阈值顺序发生了改变 | |
| 2022年7月04日 | dls | 0.5.1 后 修复了 find_blobs 函数,原先采用 cv 实现,现改为 mv 实现 |
"hello world!"
确保目标机器已经安装 maixpy3 软件包。
使用 maixpy3 包在图像上显示 "hello world!" 。
from maix import display, image
hello_img = image.new(size = (240, 240),
                              color = (255, 0, 0), mode = "RGB")     #创建一张红色背景图
hello_img.draw_string(30, 115, "hello world!", scale = 1.0,
                              color = (255, 255, 255), thickness = 1) #在红色背景图上写下hello world
display.show(hello_img)   #把这张图显示出来
[ rpyc-kernel ]( running at Fri Jan 14 16:48:03 2022 )
from maix import camera, display, image #引入python模块包

while True:
    img = camera.capture()    #从摄像头中获取一张图像
    display.show(img)         #将图像显示出来
from maix import image, display

img = image.new(size = (240, 240), color = (0, 0, 0),
                        mode = "RGB")     #创建一张黑色背景图

img.draw_line(0, 0, 100, 100, color = (127, 127, 127),
                        thickness = 1)  #画一条从(0,0)到(100,100)的白色线段

display.show(img)
[ rpyc-kernel ]( running at Fri Jan 14 16:47:26 2022 )
from maix import image, display

img = image.new(size = (240, 240), color = (0, 0, 0),
                        mode = "RGB")     #创建一张黑色背景图

img.draw_rectangle(10, 10, 60, 60, color=(255, 0, 0),
                       thickness=-1)   #画一个从(10, 10)到(60, 60)的红色实心矩形

img.draw_rectangle(80, 160, 160, 200, color=(0, 0, 255),
                       thickness=1)   #画一个从(80, 160)到(160, 200)的蓝色矩形外框

display.show(img)
[ rpyc-kernel ]( running at Fri Jan 14 16:41:39 2022 )
from maix import image, display

img = image.new(size = (240, 240), color = (0, 0, 0),
                        mode = "RGB")     #创建一张黑色背景图

img.draw_circle(50, 50, 20, color=(0, 0, 255),
                        thickness=1)   #画一个中心点在(50,50),半径为20的空心蓝圆

img.draw_circle(150, 150, 20, color=(255, 0, 0),
                        thickness=-1)  #画一个中心点在(150,150),半径为20的实心红圆

display.show(img)
[ rpyc-kernel ]( running at Fri Jan 14 16:45:05 2022 )
from maix import display, image   #引入python模块包

hello_img = image.new(size = (240, 240), color = (0, 0, 0),
                              mode = "RGB")     #创建一张黑色背景图

hello_img.draw_string(30, 115, "hello world!", scale = 1.0, color = (255, 255, 255),
                              thickness = 1) #在黑色背景图上写下hello world

display.show(hello_img)   #把这张图显示出来
[ rpyc-kernel ]( running at Fri Jan 14 16:49:17 2022 )
from maix import image, display

img = image.new(color=(255, 255, 255))
image.load_freetype("/home/res/sans.ttf")
s = "二进制例程"
x, y = image.get_string_size(s, 3)
img.draw_string(0, 120 - (y + 5), s, 3, (255, 0, 0)) # show left-button

s = "可执行文件示例"
x, y = image.get_string_size(s, 2)
img.draw_string(240 - x, 0, s, 2, (0, 255, 0)) # show right-up # wait fix

image.free_freetype()

s = "bin example"
x, y = image.get_string_size(s, 1)
img.draw_string(0, 240 - (y + 5), s, 1, (0, 0, 255)) # show left-button

display.show(img)

from maix import image, display
img = image.new(size = (240, 240), color = (0, 0, 0),
                        mode = "RGB")     #创建一张黑色背景图
img.draw_ellipse(120, 40, 20, 50, 90, 0, 360, color=(0,255,0),
                        thickness = 1)
display.show(img)
[ rpyc-kernel ]( running at Fri Jan 14 16:49:49 2022 )
画椭圆的参数比较复杂,暂无 API 说明。
from maix import image, display

img = image.new(color=(255, 0, 0))
img.draw_string(100, 100, "hello", 2, color=(0, 0, 255))

mk = img.crop(90, 90, 100, 50) # 截一张图出来, x, y, w, h
imga = image.new(color=(0, 255, 0))
imga.draw_image(mk, 10, 10)
# imga.draw_image(imga) # py no-allow use self but libmaix support
imga.draw_image(mk, 100, 100, alpha=0.5)
display.show(imga)
[ rpyc-kernel ]( running at Sat May 7 11:54:46 2022 )
图像的缩放、旋转、翻转
在 0.4.8 之后的镜像后才支持翻转 。
resize(w, h, func) # width, height, cv::INTER_LINEAR
flip(code) # -1 horizontal & vertical, 1 horizontal, 0 vertical
rotate(angle, adjust) # [-360, +360], adjust uasge
from maix import image, display

img = image.new(color=(255, 0, 0))
img.draw_string(100, 100, "KL", 2, color=(0, 0, 255))

mk = img.crop(90, 90, 50, 50)

imga = image.new(color=(0, 255, 0))

imga.draw_image(mk, 10, 10) # 原图

imga.draw_image(mk.rotate(-90), 70, 10) # 顺时针 90 旋转

imga.draw_image(mk.flip(1), 130, 10) # 水平翻转 horizontal

imga.draw_image(mk.resize(80, 50), 10, 80) # 缩放到 (80, 50)

imga.draw_image(mk.flip(0), 100, 80) # 垂直翻转 vertical

imga.draw_image(mk.rotate(-135, adjust=0), 10, 150) # 顺时针 135 旋转

imga.draw_image(mk.rotate(+45, adjust=1), 100, 150) # 逆时针 45 旋转

display.show(imga)
[ rpyc-kernel ]( running at Wed May 11 16:05:34 2022 )
from maix import image, display

img = image.new(size=(240, 240), mode="RGB", color=(255, 255, 255))
img.draw_line(0, 0, 240, 240)
img.draw_rectangle(40, 120, 160, 200, color=(255, 0, 0), thickness=16) #
img.draw_circle(120, 120, 20, color=(0, 255, 0))
img.draw_string(40, 40, "dalaoshu", 2, color=(0, 0, 255))

import cv2
import numpy as np
cv_img = cv2.imdecode(np.frombuffer(img.tobytes('jpg'), np.uint8), cv2.IMREAD_COLOR)

cv_img = cv_img[ : , : , (2,1,0)]

tmp = image.load(cv_img.tobytes(), cv_img.shape)

tmp.save('tmp.jpg')

img_encode = cv2.imencode('.jpg', cv_img)[1]

tmp = image.open(img_encode.tobytes())

tmp.save('tmp.jpg')
以上操作都是在 linux desktop 分支下测试的,其他平台需要自备 opencv 和 numpy 喔。
from maix import image, display

img = image.new(size=(240, 240), mode="RGB", color=(255, 255, 255))
img.draw_line(0, 0, 240, 240)
img.draw_rectangle(40, 120, 160, 200, color=(255, 0, 0), thickness=16) #
img.draw_circle(120, 120, 20, color=(0, 255, 0))
img.draw_string(40, 40, "dalaoshu", 2, color=(0, 0, 255))

# 保存图片到 test.png 中
img.save("test.png")
# 读取 test.png 中的图片
tmp = image.open("test.png")

# 0.5.0 以后支持导出 jpg 、 bmp 、 png 、 默认 rgb 等格式的图像数据到 bytes 变量中,方便向外传输图像数据。
img_bytes = tmp.resize(size=(160, 120)).tobytes('jpg')
# >>> img_bytes = img.tobytes('jpg')
# >>> img_bytes[:2]
# b'\xff\xd8'
# >>> img_bytes[-2:]
# b'\xff\xd9'
# >>>
# >>> img_bytes = img.tobytes('bmp')
# >>> img_bytes[:2]
# b'BM'
# >>> img_bytes = img.tobytes('rgb')
# >>> img_bytes[:2]
# b'\x00\x00'
# >>> img_bytes = img.tobytes('png')
# >>> img_bytes[:2]
# b'\x89P'
# >>>

# 0.5.2 以后 image.open 支持直接打开上述格式导出的 bytes 编码数据。
tmp = image.open(img_bytes)
print('tmp.png', tmp)

tmp.save("tmp.png")

display.show(tmp)
tmp.png <_maix_image.Image 0x21d3550 " width":160, "height":120, "type"=RGB, "size":57600>
【传统视觉基础】寻找色块(颜色识别)
该功能需要更新到 0.5.1 版本以后,填色的顺序为 [(L 最小值, L 最大值, A 最小值, A 最大值, B 最小值, B 最大值)]。
使用 find_blobs 的查找色块算法,查找图像中符合 LAB 颜色阈值的色块,可以在列表中放入多个阈值区间进行匹配,通过阈值编辑工具可将目标颜色变成白色意为提取,其他颜色全变为黑色表示忽略。
如 blue = 13, 54, 11, 48, -91, -28 为什么是 蓝色 的 lab 阈值,这是因为使用 LAB 阈值工具可以获得两个期望颜色区间的最大和最小的 L A B 值,所以上图对应的下图示意图的顺序。
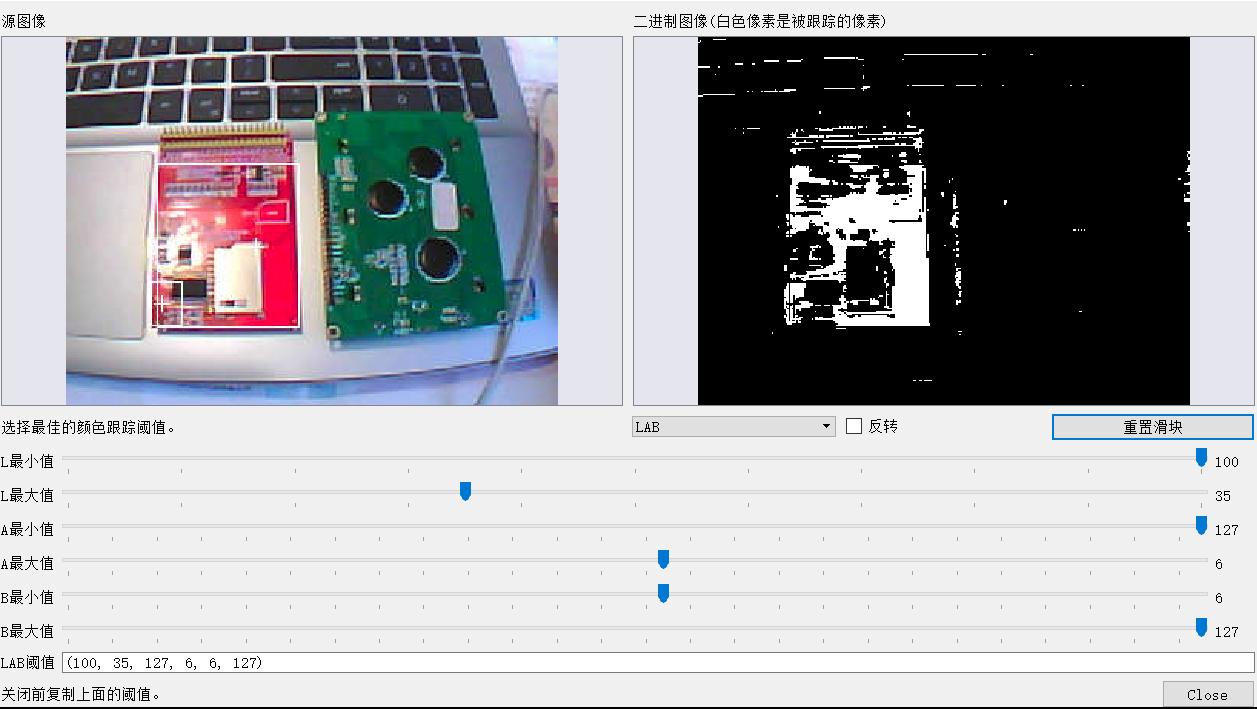
现已支持在线图传调试 LAB 阈值 wiki.sipeed.com/threshold ,动态调试效果请看 Github 实现。
注意,在线调试使用的是 OPENCV 的函数,和 OPENMV 的实际表现在 Y 通道上有差距,如果遇到调试时可用,实机有差距时,只需要将调试出来的 L 值通道,对其 ±10 或 ±20 就可以使用了。
Lab颜色空间中的L分量用于表示像素的亮度,取值范围是 [0,100],表示从纯黑到纯白;a表示从红色到绿色的范围,取值范围是 [127,-128];b表示从黄色到蓝色的范围,取值范围是 [127,-128]。
from maix import image, display, camera
blue = [(34, 100, -38, 3, -128, -28)]  # 0.5.0 以后蓝色的 lab 阈值,0.4.9 之前为 [(13, 11, -91, 54, 48, -28)]
while True:
    img = camera.capture()
    blobs = img.find_blobs(blue, merge=True)    #在图片中查找lab阈值内的颜色色块 merge 合并小框。
    if blobs:
        for i in blobs:
            img.draw_rectangle(i["x"], i["y"], i["x"] + i["w"], i["y"] + i["h"],
                               color=(0, 0, 255), thickness=1) #将找到的颜色区域画出来
    display.show(img)
【传统视觉基础】阈值处理
该功能需要更新到 0.5.3 版本以后
基于上述获得的 LAB 阈值,可以直接应用到图像上(俗称二值化),便于后续的寻线寻迹预处理,可以解决红、黄、蓝、绿线等各种场合。

这里演示的是蓝色跑道白色数值的场合,当然具体情况具体分析吧!
不想
pip install -U maixpy3联网下载的可以到 pypi 下载 armv7l 的 whl 包放到板子里使用pip install maixpy3*.whl -U安装。
from maix import image, display, camera
THRESHOLD = [(34, 100, -38, 3, -128, -28)]
while True:
    img = camera.capture().binary(THRESHOLD, invert=False, zero=False) # invert 取反阈值,zero 是否不填充阈值区域。
    display.show(img)

from maix import camera, display, image
while True:
    img = camera.capture()
    tmp = img.find_lines((0, 0, 240, 240), 2, 1, 1100, 50, 50)
    for l in tmp:
        img.draw_line(l[0], l[1], l[2], l[3], color = (0, 255, 0))
    display.show(img)
【传统视觉基础】寻线寻迹
找线算法是面对小车寻线而开发的一个算法。主要的流程是,灰度化 -> 自适应阈值处理 -> 形态学运算 -> 图像最小二乘法。完成算法流程后返回一条线的信息,让小车能够根据识别出来线的信息进行运动。这个接口比较适合做图像寻线。
对应实现 点我跳转到 github
from maix import image, display, camera
import time

while True:
  img = camera.capture()
  line = img.find_line()
  img.draw_line(line["rect"][0], line["rect"][1], line["rect"][2],
                line["rect"][3], color=(255, 255, 255), thickness=1)
  img.draw_line(line["rect"][2], line["rect"][3], line["rect"][4],
                line["rect"][5], color=(255, 255, 255), thickness=1)
  img.draw_line(line["rect"][4], line["rect"][5], line["rect"][6],
                line["rect"][7], color=(255, 255, 255), thickness=1)
  img.draw_line(line["rect"][6], line["rect"][7], line["rect"][0],
                line["rect"][1], color=(255, 255, 255), thickness=1)
  img.draw_circle(line["cx"], line["cy"], 4,
                  color=(255, 255, 255), thickness=1)
  display.show(img)
from maix import image, display, camera
import time

while True:
  img = camera.capture()
  colors = img.get_blob_color((100, 100, 10, 10), 0, 0)
  img.draw_rectangle(100, 100, 110, 110,
                               color=(255, 0, 0), thickness=1) #将找到的颜色区域画出来
  img.draw_rectangle(9, 9, 21, 21,
                               color=(255, 255, 255), thickness=1) #将找到的颜色区域画出来
  img.draw_rectangle(10, 10, 20, 20,
                               color=(int(colors[0]), int(colors[1]), int(colors[2])), thickness=-1) #将找到的颜色区域画出来
  display.show(img)
from maix import camera, display, zbar
while True:
    img = camera.capture()
    result = zbar.scan_codes(["qrcode", "code39"], img)
    display.show(img.draw_string(10, 10, str(result), 2.0, (255, 0, 0)))
