MaixCAM MaixPy 检测人体关键点姿态检测
简介
使用 MaixPy 可以轻松检测人体关节的关键点的坐标,用在姿态检测比如坐姿检测,体感游戏输入等。
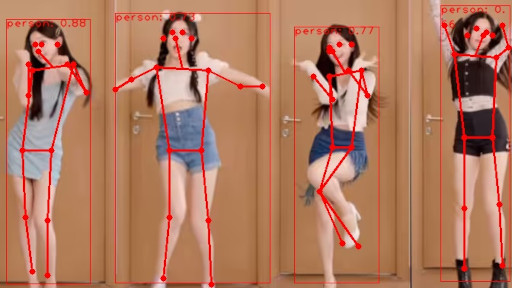
MaixPy 实现了基于 YOLOv8-Pose / YOLO11-Pose 的人体姿态检测,可以检测到人体17个关键点。

使用
使用 MaixPy 的 maix.nn.YOLOv8 或者 maix.nn.YOLO11 类可以轻松实现:
from maix import camera, display, image, nn, app

detector = nn.YOLO11(model="/root/models/yolo11n_pose.mud", dual_buff = True)
# detector = nn.YOLOv8(model="/root/models/yolov8n_pose.mud", dual_buff = True)

cam = camera.Camera(detector.input_width(), detector.input_height(), detector.input_format())
disp = display.Display()

while not app.need_exit():
    img = cam.read()
    objs = detector.detect(img, conf_th = 0.5, iou_th = 0.45, keypoint_th = 0.5)
    for obj in objs:
        img.draw_rect(obj.x, obj.y, obj.w, obj.h, color = image.COLOR_RED)
        msg = f'{detector.labels[obj.class_id]}: {obj.score:.2f}'
        img.draw_string(obj.x, obj.y, msg, color = image.COLOR_RED)
        detector.draw_pose(img, obj.points, 8 if detector.input_width() > 480 else 4, image.COLOR_RED)
    disp.show(img)
另外代码也在MaixPy/examples/vision目录下可以找到。
可以看到因为用了YOLOv8-Pose 所以这里直接用了YOLOv8这个类,和YOLOv8物体检测模型只是模型文件不同, YOLO11同理,然后就是detect函数返回的结果多了points值,是一个int类型的list列表,一共17个点,按次序依次排列,比如第一个值是鼻子的 x 坐标, 第二个值是鼻子的 y 坐标,依次为:
1. 鼻子(Nose)
2. 左眼(Left Eye)
3. 右眼(Right Eye)
4. 左耳(Left Ear)
5. 右耳(Right Ear)
6. 左肩(Left Shoulder)
7. 右肩(Right Shoulder)
8. 左肘(Left Elbow)
9. 右肘(Right Elbow)
10. 左手腕(Left Wrist)
11. 右手腕(Right Wrist)
12. 左髋(Left Hip)
13. 右髋(Right Hip)
14. 左膝(Left Knee)
15. 右膝(Right Knee)
16. 左脚踝(Left Ankle)
17. 右脚踝(Right Ankle)
如果某些部位被遮挡,那么值为-1。
更多输入分辨率模型
默认的模型是输入是320x224分辨率,如果你希望使用更大分辨率的模型,可以到 MaixHub 模型库下载并传输到设备使用:
- YOLOv8-Pose: https://maixhub.com/model/zoo/401
- YOLO11-Pose: https://maixhub.com/model/zoo/454
分辨率越大理论上精度越高但是运行速度更低,根据你的使用场景选择,另外如果提供的分辨率不满足你的要求你也可以自己到 YOLOv8-Pose / YOLO11-Pose 使用摸新训练源码导出自己的onnx模型,然后转换为 MaixCAM 支持的模型(方法见后面的文章)。
dual_buff 双缓冲区加速
你可能注意到这里模型初始化使用了dual_buff(默认值就是 True),使能 dual_buff 参数可以加快运行效率,提高帧率,具体原理和使用注意点见 dual_buff 介绍。

 中文
中文