English
MaixCAM MaixPy Self-Learning Classifier
Introduction to MaixPy Self-Learning Classifier
Usually, to recognize new categories, we need to collect a dataset on a computer and retrain the model, which is a cumbersome and difficult process. Here, we provide a method that allows for instant learning of new objects directly on the device without the need for computer-side training, suitable for less complex scenarios.
For example, if there is a bottle and a phone in front of you, you can use the device to take a picture of each as the basis for two classifications. Then, you collect a few more pictures of them from different angles, extract their features and save them. During recognition, the feature values of the image are compared with the saved feature values, and the classification that is more similar to the saved features is considered the corresponding classification.
Using the Self-Learning Classifier in MaixPy
The default image comes with the Self-Learning Classification APP, which you can use directly to get familiar with the process.
Steps:
- Click the
+ Classbutton to collect n classification (class) images. The object needs to be within the white frame on the screen while collecting the images. - Click the
+ Samplebutton to collect m sample images. Collect some images for each classification. The order does not matter, and the number is flexible. It's best to take pictures from different angles, but not too different. - Click the
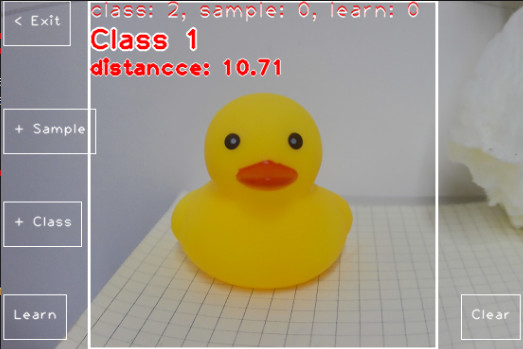
Learnbutton to start learning. The device will automatically classify and learn based on the collected classification and sample images, obtaining the characteristics of the classifications. - Align the object with the center of the screen, recognize the image, and output the result. The screen will show the classification it belongs to and the similarity distance to this classification. The closer the similarity distance, the more similar it is.
- The feature values learned by this APP will be saved to
/root/my_classes.bin, so the last one will be automatically loaded after exiting the application or restarting it.
Simplified version of the code, for the complete version, please refer to the examples for the full code.
from maix import nn, image

classifier = nn.SelfLearnClassifier(model="/root/models/mobilenet_v2_no_top.mud", dual_buff = True)

img1 = image.load("/root/1.jpg")
img2 = image.load("/root/2.jpg")
img3 = image.load("/root/3.jpg")
sample_1 = image.load("/root/sample_1.jpg")
sample_2 = image.load("/root/sample_2.jpg")
sample_3 = image.load("/root/sample_3.jpg")
sample_4 = image.load("/root/sample_4.jpg")
sample_5 = image.load("/root/sample_5.jpg")
sample_6 = image.load("/root/sample_6.jpg")

classifier.add_class(img1)
classifier.add_class(img2)
classifier.add_class(img3)
classifier.add_sample(sample_1)
classifier.add_sample(sample_2)
classifier.add_sample(sample_3)
classifier.add_sample(sample_4)
classifier.add_sample(sample_5)
classifier.add_sample(sample_6)

classifier.learn()

img = image.load("/root/test.jpg")
max_idx, max_score = classifier.classify(img)
print(max_idx, max_score)
Storing and Loading Learned Feature Values
Use the save function to store the learned feature values. This will generate a binary file containing the feature values of the objects. When you need to use it again, simply use the load function to load the feature values.
classifier.save("/root/my_classes.bin")
classifier.load("/root/my_classes.bin")
If you have named each classification and stored them in the labels variable, you can also use:
classifier.save("/root/my_classes.bin", labels=labels)
labels = classifier.load("/root/my_classes.bin")
dual_buff Dual Buffer Acceleration
You may have noticed that the model initialization uses dual_buff (which defaults to True). Enabling the dual_buff parameter can improve running efficiency and increase the frame rate. For detailed principles and usage notes, see dual_buff Introduction.