

 English
Update debugger
Update history
| Date | Version | Author | Update content |
|---|---|---|---|
| 2025-04-18 | v0.3 | Serika |
|
| 2025-02-18 | v0.2 | Serika |
|
| 2025-02-10 | v0.1 | Serika |
|
Overview
All Sipeed Tang series have onboard debugger (except standalone SOM). The debuggers are separate MCUs with their own firmware. Users could update the firmware for these debuggers to get feature updates and bug fixes.
We need to use the BouffaloLabDevCube to program these onboard debugger chips, and documentation about the *chips & tools* can be found here.
Here is a brief step-by-step guide:
- Download and install the corresponding edition of the *tools* according to your OS.
- Get the updated debugger firmware for your board from Sipeed Download Station.
- Refer to the official documentation of BouffaloLabDevCube to update the firmware of the onboard debugger.
- For Windows users, there are detailed step-by-step tutorial below. Also, the steps for other operating systems are similar.
Tutorial
Preparation for Hardware
To put the onboard debugger into DFU mode, press the *Update Button* or short the corresponding *Test Points* before power on the board or connecting the board's debug USB port with a cable.
Please refer to the below for the corresponding *Update Button* and *Test Points*.
Tang nano series
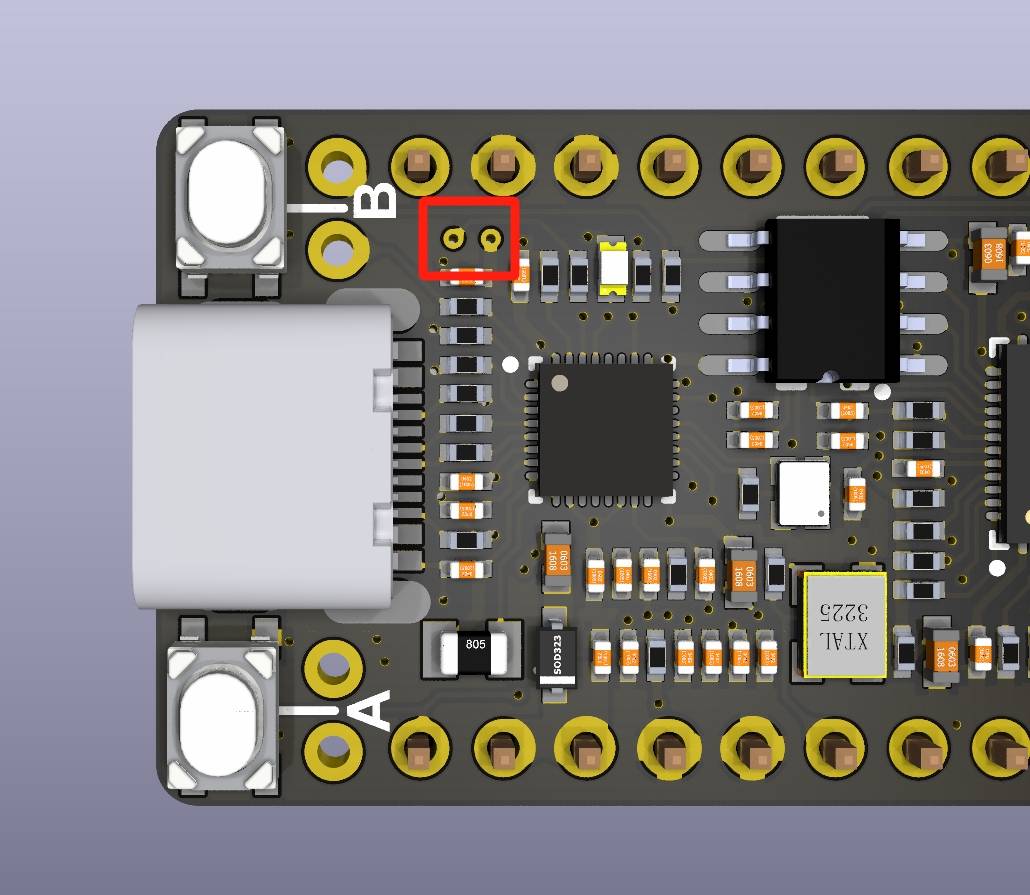
Tang nano 1k
The 2
Test Pointsis in the upper left corner of the board TOP side, behind theKEY-B.Click for details
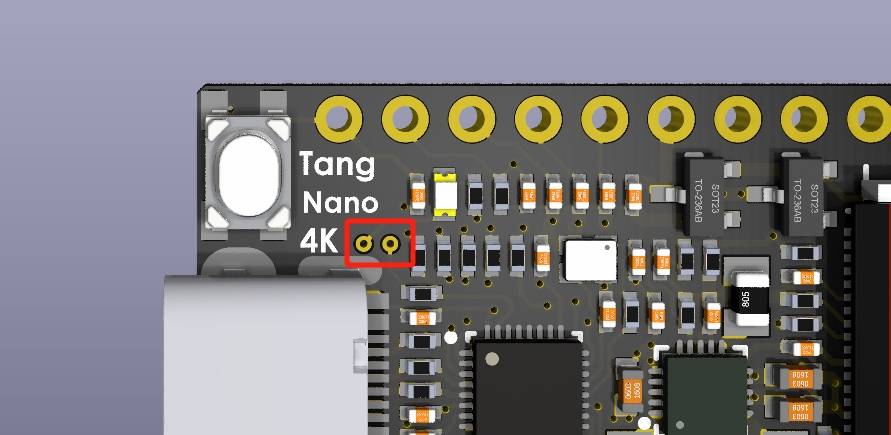
Tang nano 4k
The 2
Test Pointsis in the upper left corner of the board TOP side, behind the USB-C connector.Click for details
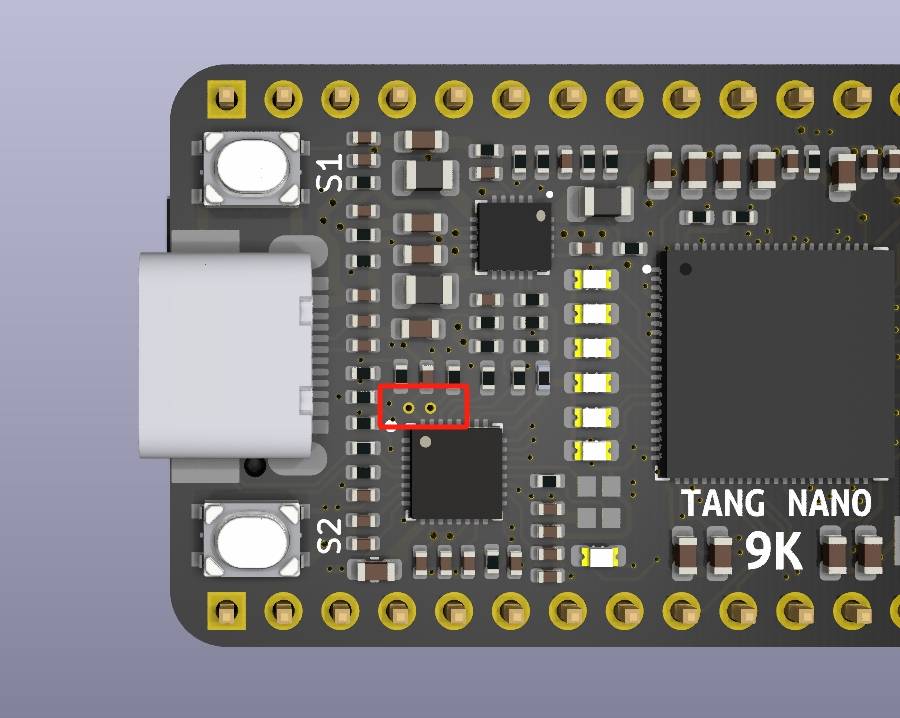
Tang nano 9k
The 2
Test Pointsis in the middle left of the board TOP side, behind the USB-C connector.Click for details
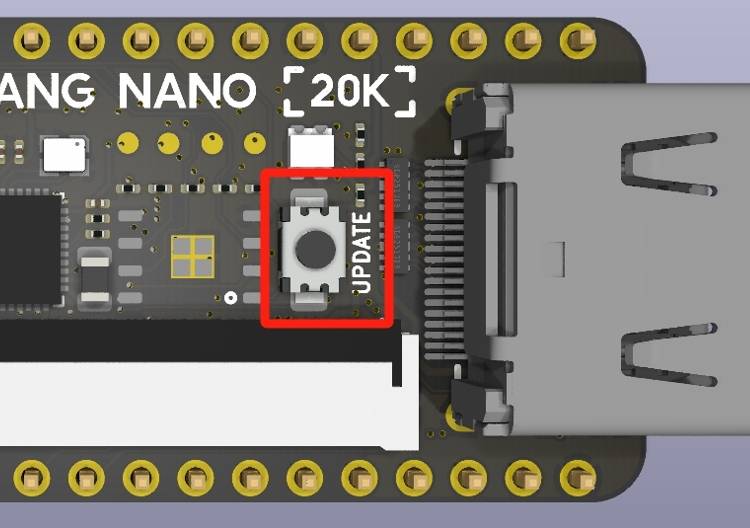
Tang nano 20k
The
Update Buttonbehind the HDMI connector on the TOP side has the silkscreenUPDATE.Click for details
Tang Primer series
Tang Primer 25k Dock
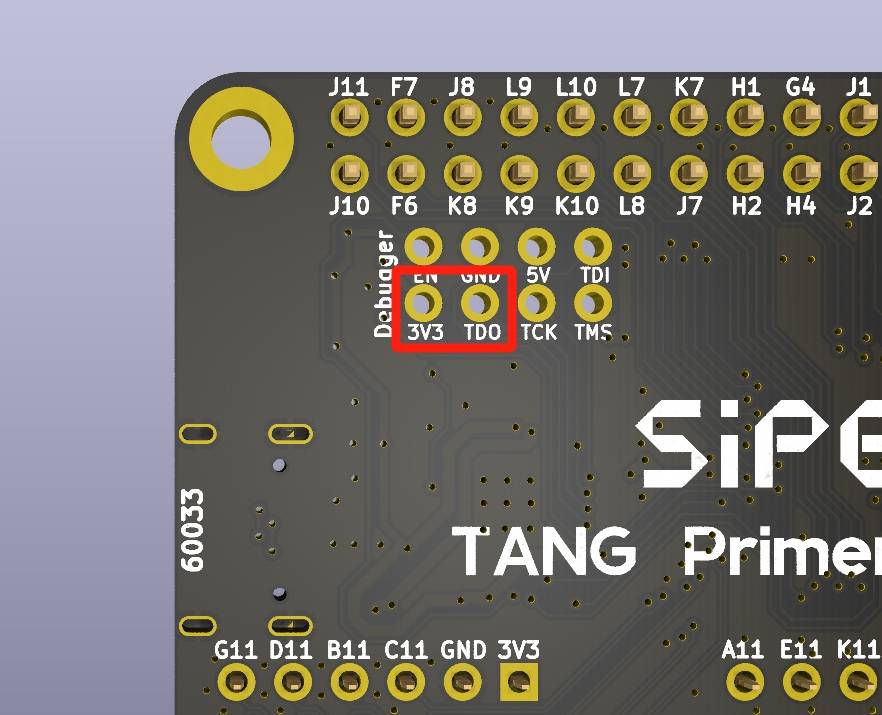
The 2
Test Pointsis in the upper left corner of the board BOT side, marked as3V3&TDO.Click for details
Tang Primer 20k Dock
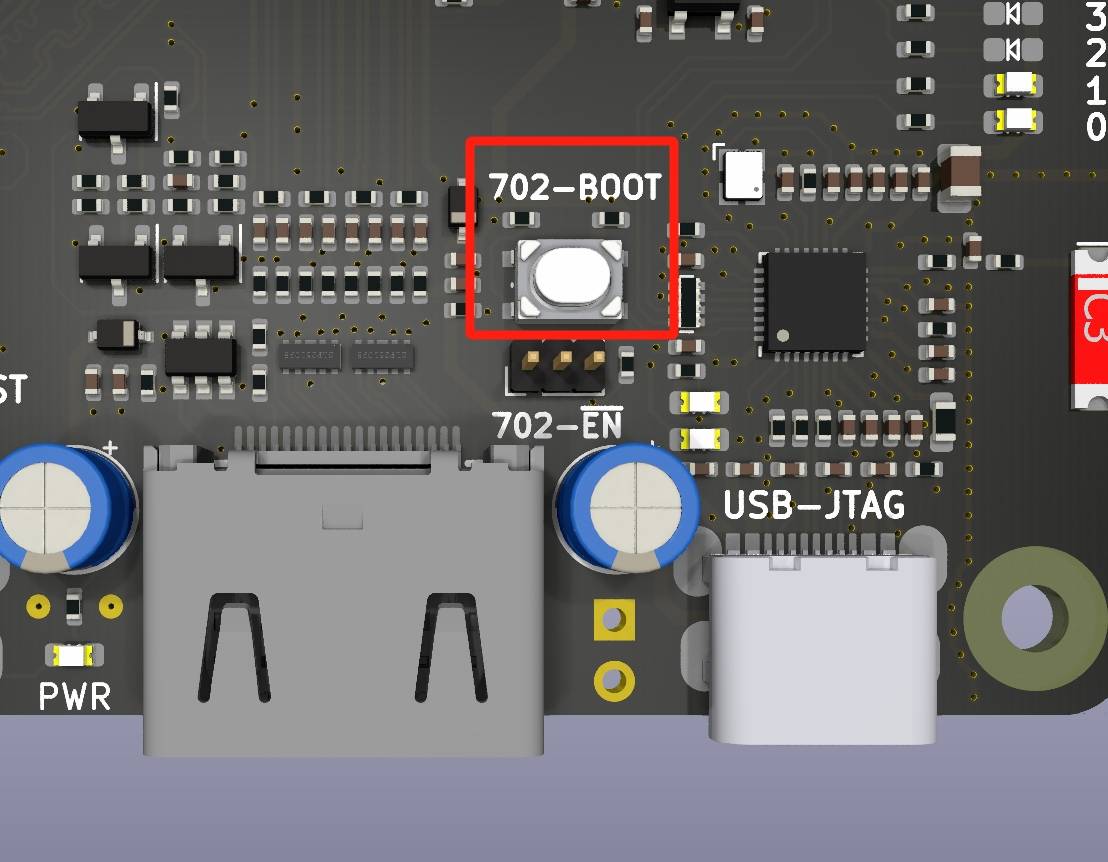
The white
Update Buttonis on the lower right side of the TOP side of the Dock board between USB-C debug port and HDMI port, marked as702-BOOTClick for details
Tang Primer 15k Dock(Not yet released)TBD
Tang Mega series(include Tang Console)
Tang Mega Neo Dock(inclede Tang Mega 138K Dock)
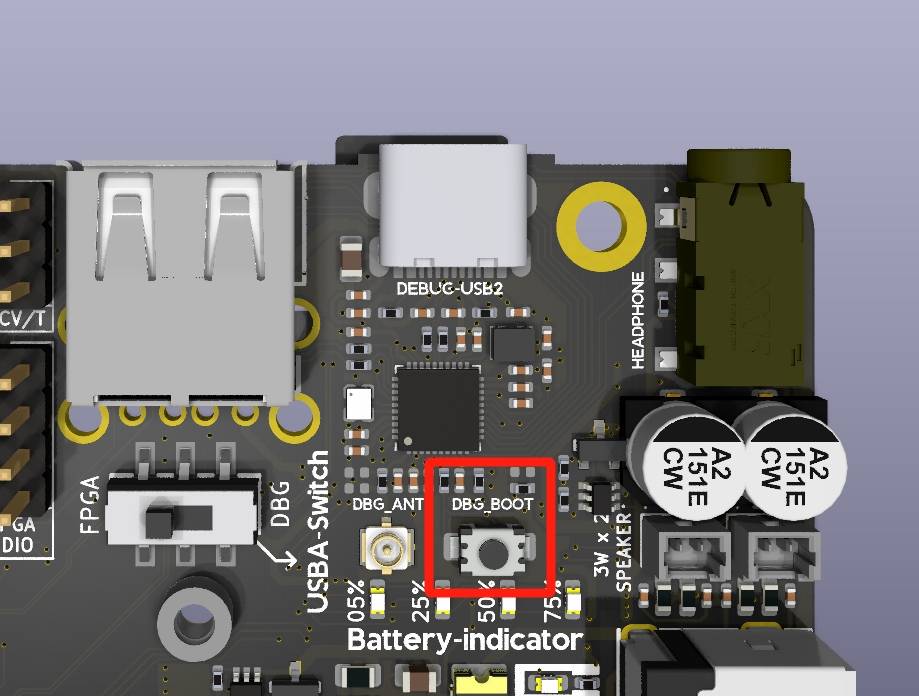
The
Update Buttonis blow the USB-C connector marked as DEBUG-USB2 on the TOP side.Click for details
Tang Mega 138K Pro Dock
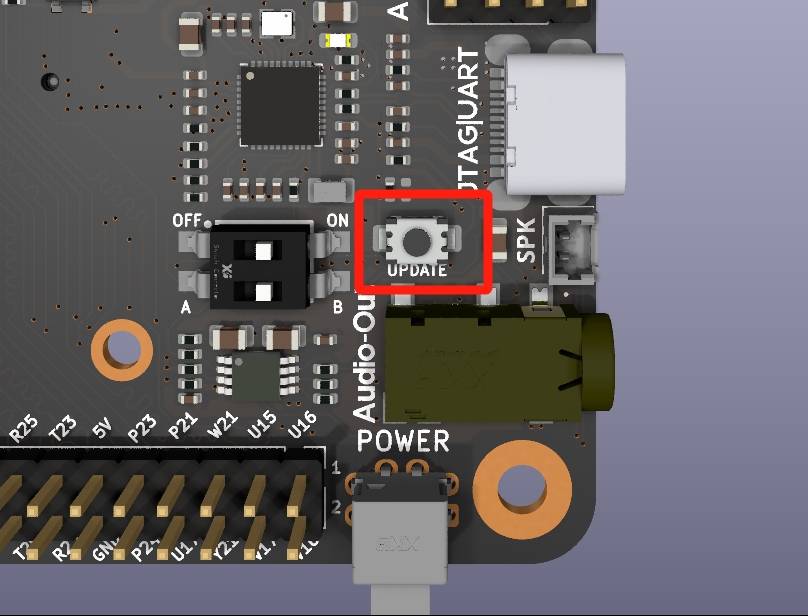
The
Update Buttonis on the left of the USB-C connector marked as JATG|UART on the TOP side.Click for details
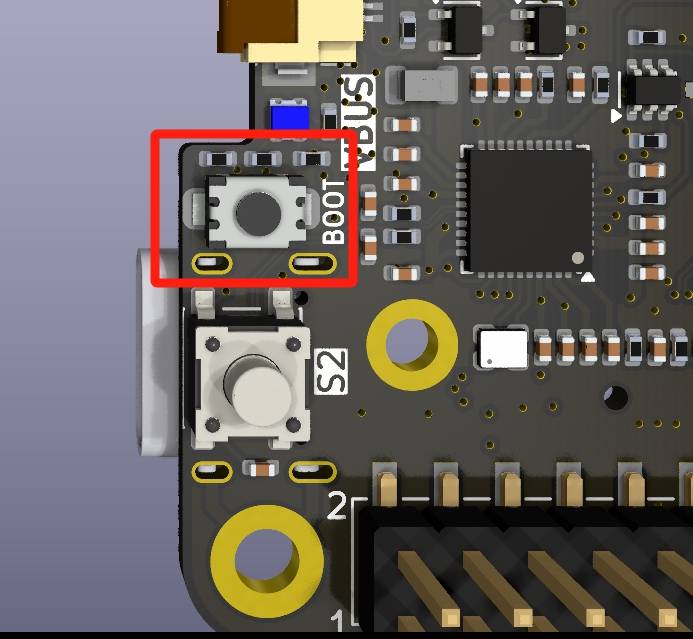
Tang Console
The
Update Buttonis on the other side the USB-C connector on the TOP side, the shorter of the 2 buttons marked adBOOT.Click for details
Preparation for Software
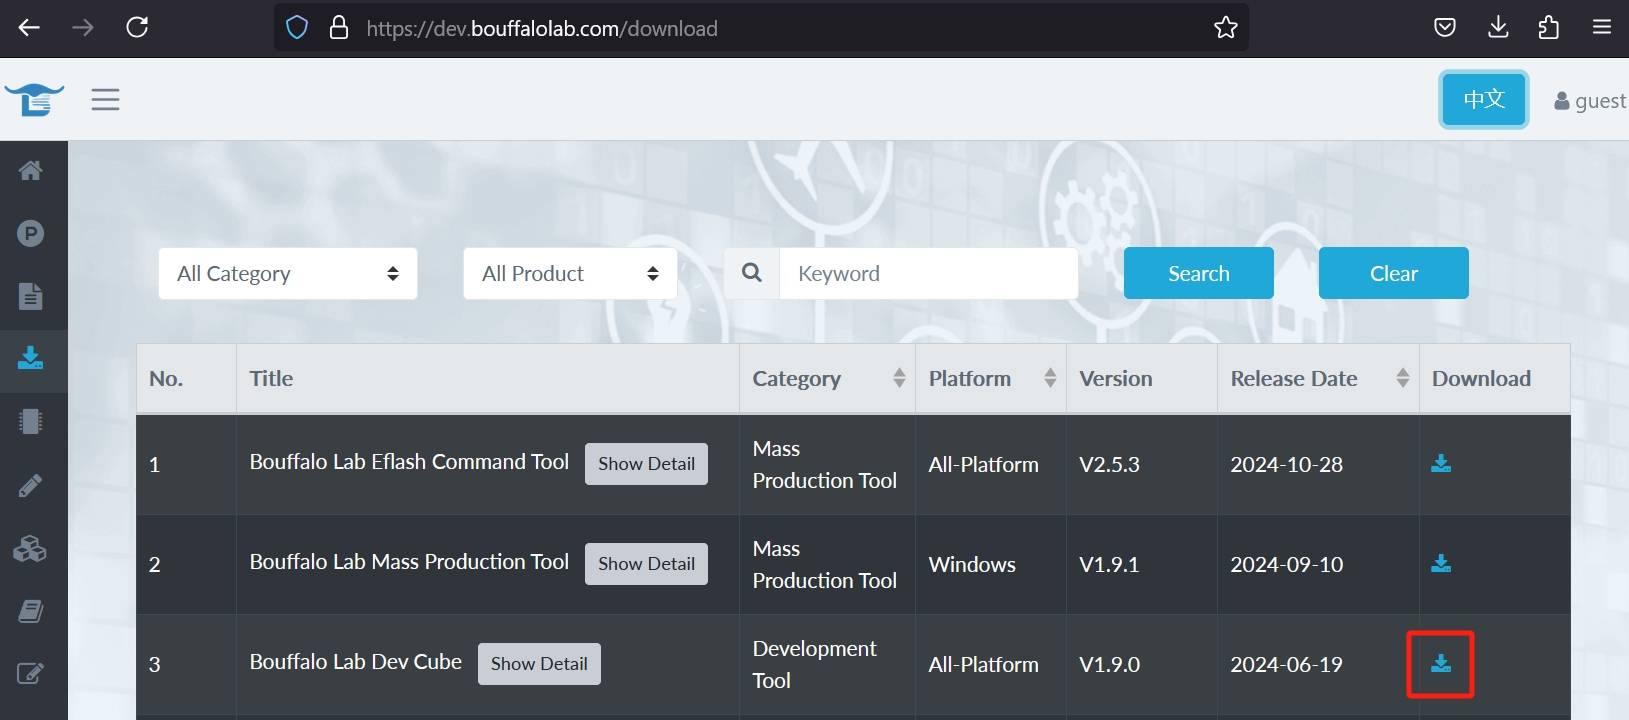
First, download BouffaloLabDevCube from BouffaloLab Official Website, The latest version is
1.9.0(February 10, 2025).Click for details
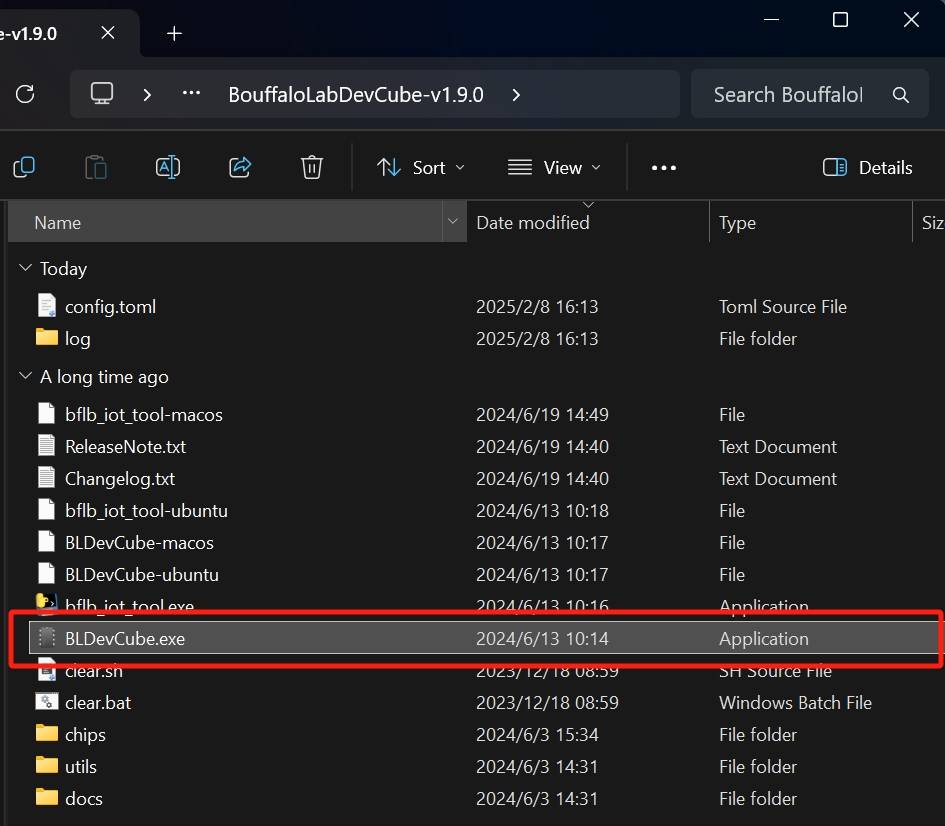
Unzip the downloaded content and execute the corresponding executable file, for Windows this is
BLDevCube.exeClick for details
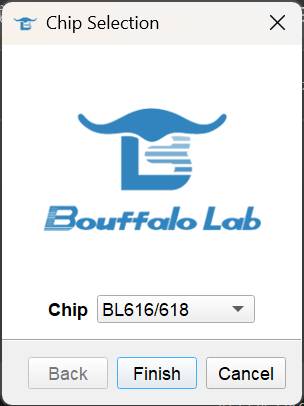
In the pop-up window, select Chip model as BL616/618.
Click for details
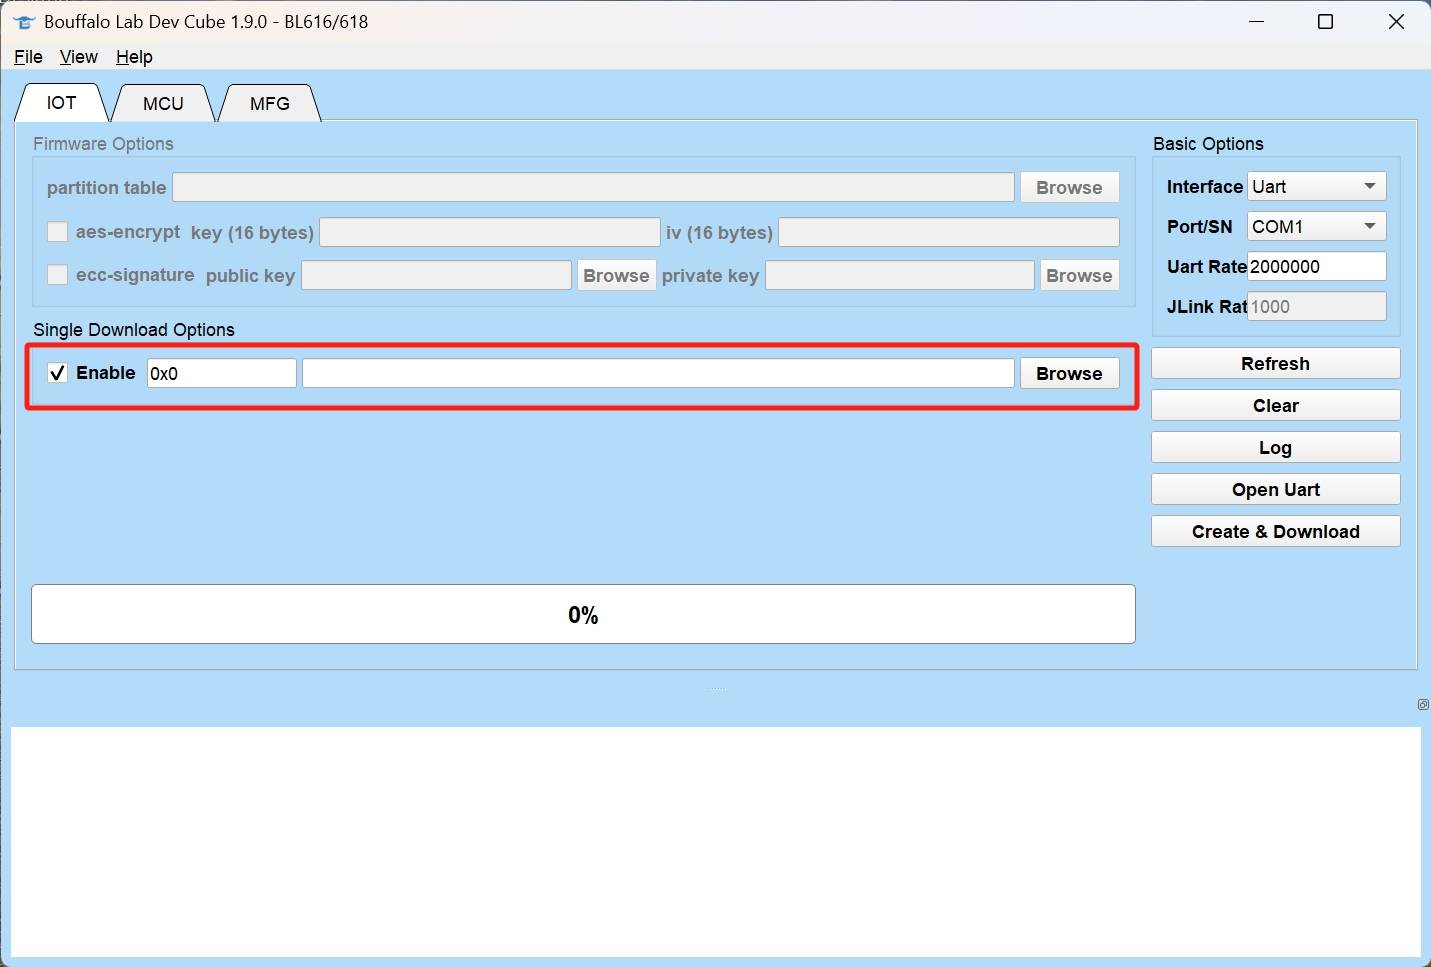
In the new window, check the
Enablecheckbox in blow the *Single download option. Click theBrowse* button to select the firmware file to be updated.Click for details
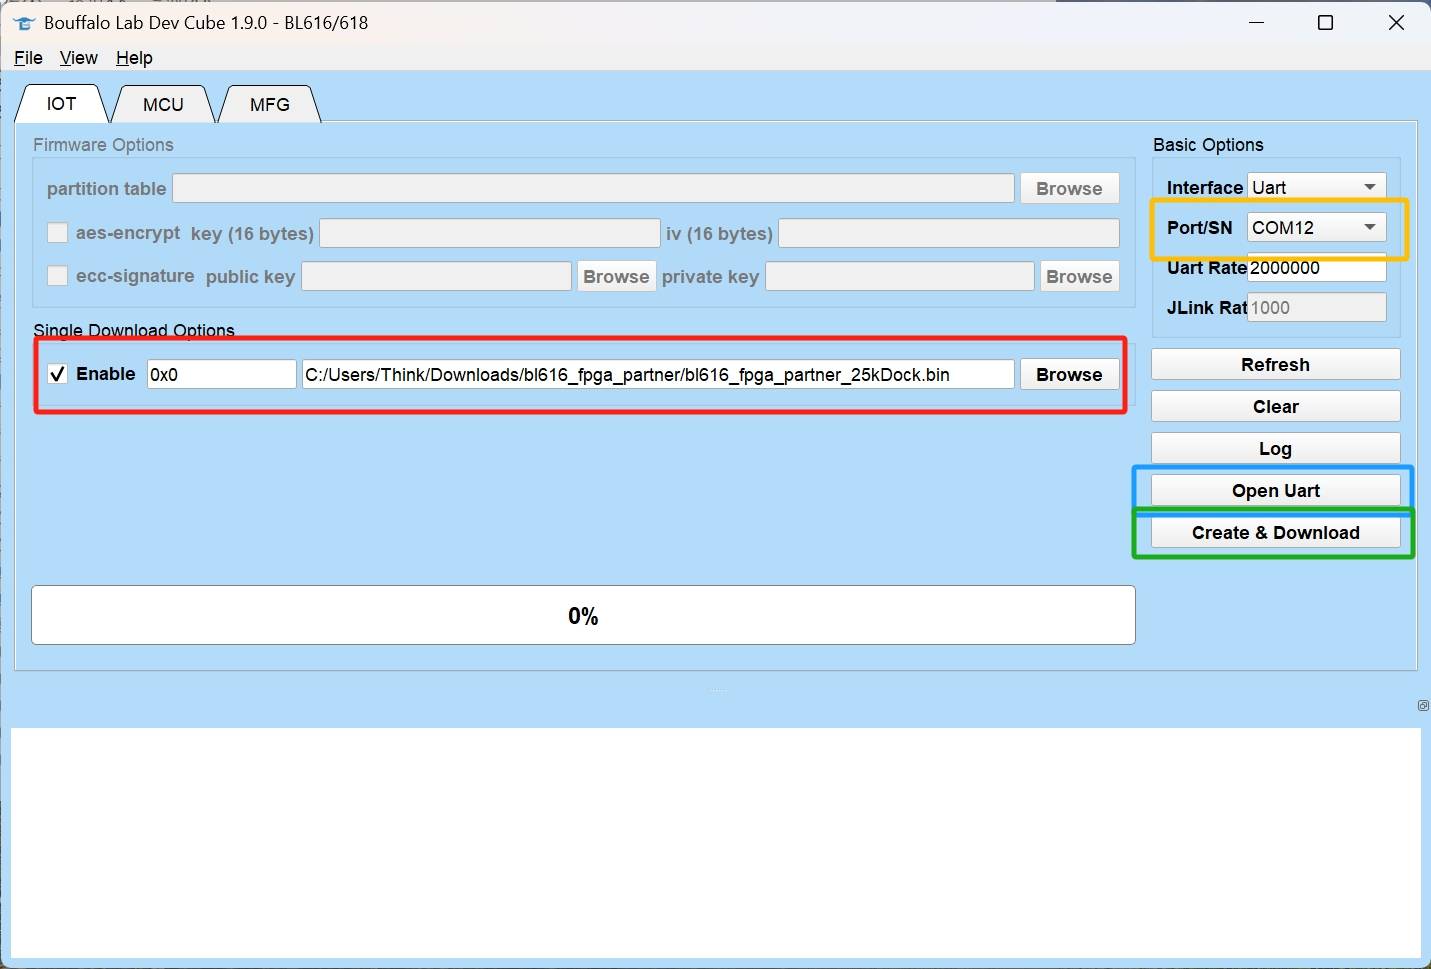
Let the onboard debugger into DFU mode, it should be a CDC-ACM device for both BL702 or BL616. On Windows, this registers a new COM port, in this example is
COM12. For Linux users, CDC-ACM usual register as/dev/ttyACMx. For macOS users, it may register as/dev/tty.usbmodemxxxxor/dev/cu.usbmodemxxxx. (Eachxrepresents a digit)Click for details

Now, set the BLDevCube up as shown below. Set the firmware file location, the port for DFU mode, then click
Open UART, and finally clickCreate & Download.Click for details
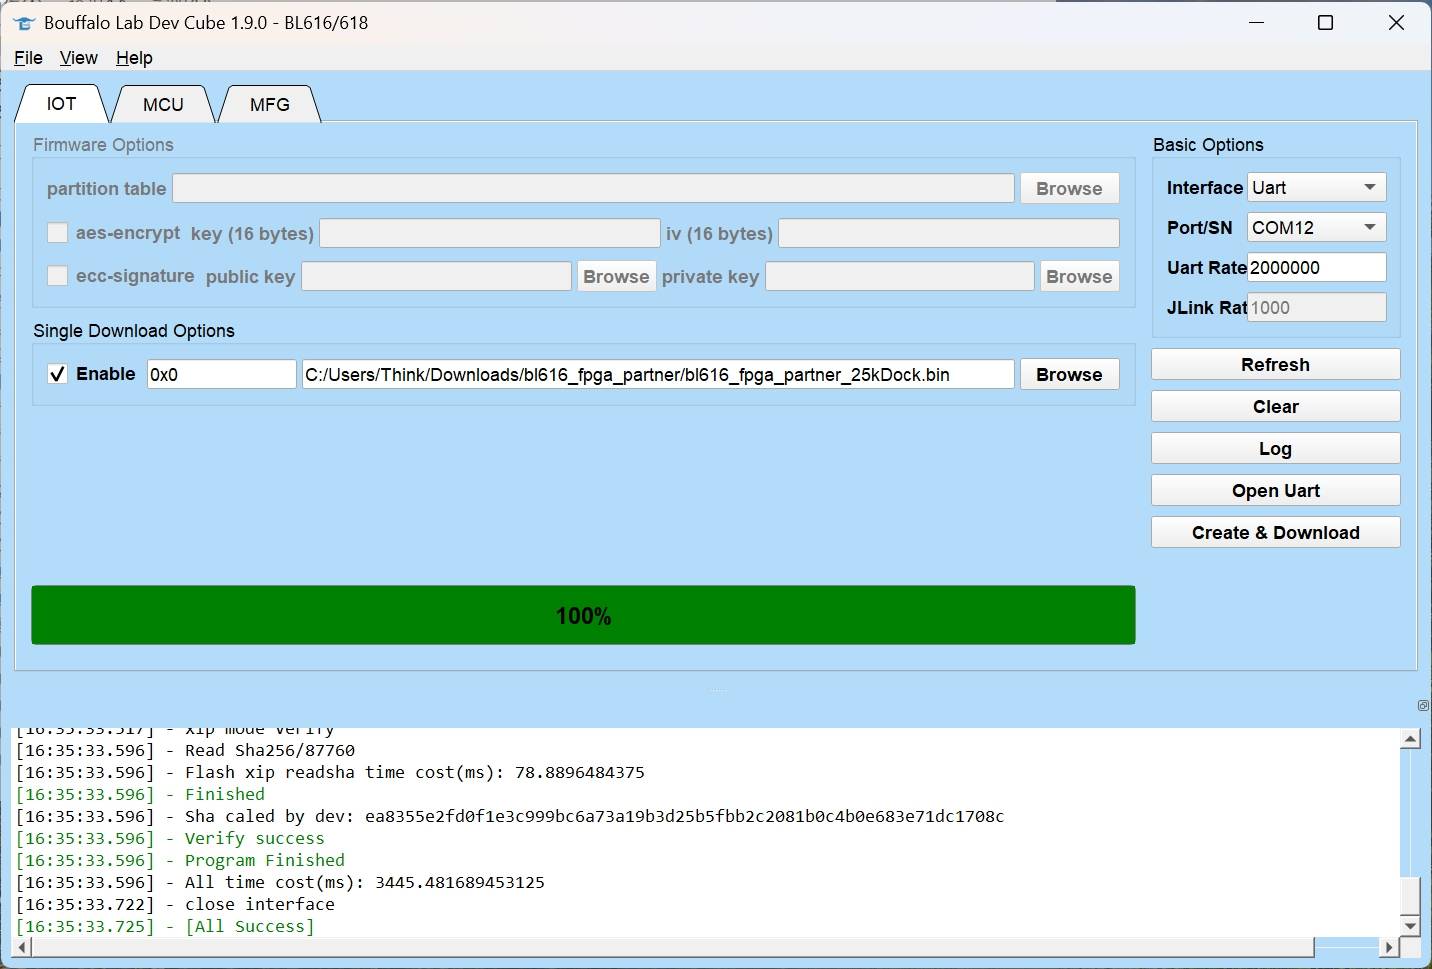
Wait for the download to complete as shown in the image below.
Click for details
Confirm the results
After completing the above steps, we need to confirm that the firmware of the onboard debugger is successfully burned. Usually replug the USB cable or re-poweron the board will confirm it.
In Windows, you can see two new devices in the device manager:
USB Converter AandUSB Converter B.
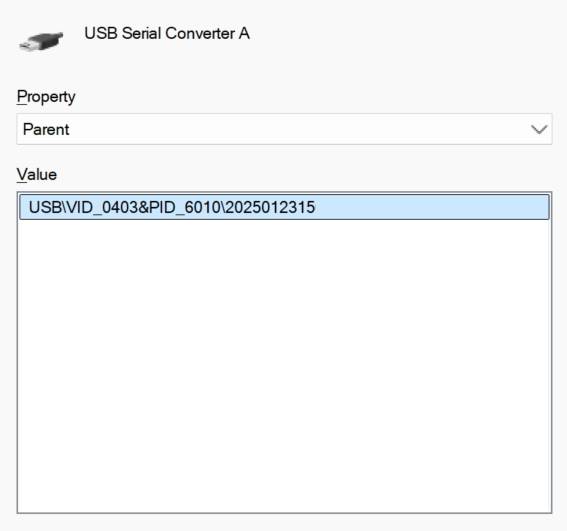
To confirm the debugger firmware version, double-click any
USB Converterand go to the Details tab. Then selectParentOptions from the drop-down menu:Click for details
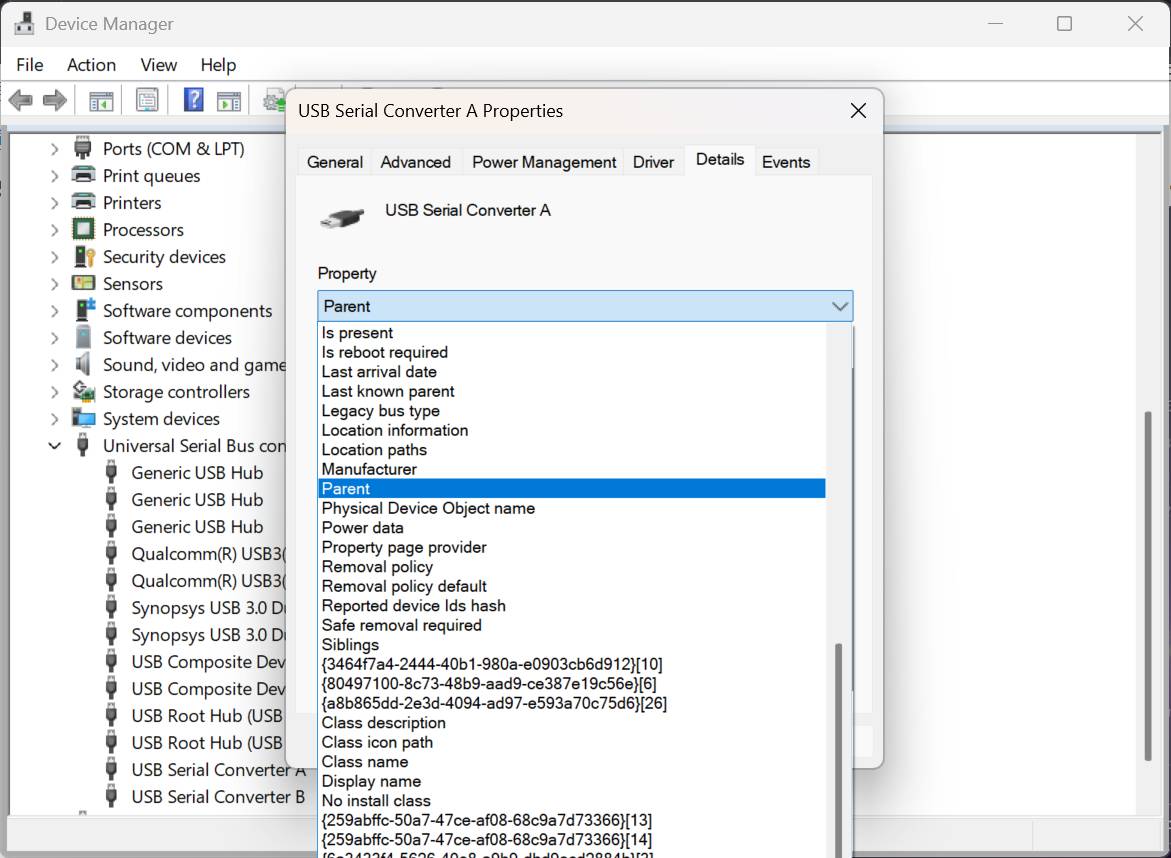
As shown in the figure below, the last 10 digits
2025102315are the serial number of the debugger firmware version. Linux & macOS users could use commanddmesgto check the serial number in kernel log.Click for details
Additional notes for Tang Core
Click for details
For development boards that support Tang Core (such as the Tang Console), the proper execution of Tang Core functionality requires both the Debugger Firmware and the secondary boot TangCore firmware for BL616.
The Debugger Firmware can be found at the bottom of this page, while the secondary boot TangCore firmware for BL616 is currently maintained by nand2mario. The latest version is available in the TangCore Release Package.
The Debugger Firmware should be written to the flash starting address 0x0, whereas the TangCore firmware for BL616 should be written to the flash address 0x40000.
The original installation documentation can be found here.
Please note: For BL616, only Debugger Firmware versions 2025030317 and later support the secondary boot functionality.
Latest firmware
The latest firmware serial numbers of all Tang series onboard debuggers are recorded here:
| Board | MCU model | Download | Serial num. | Firmware SHA256 Checksum |
|---|---|---|---|---|
| nano 1K | BL702 | N/A | N/A | N/A |
| nano 4K | BL702 | N/A | N/A | N/A |
| Nano 9K | BL702 | N/A | N/A | N/A |
| Primer 20K | BL702 | N/A | N/A | N/A |
| nano 20K | BL616 | Click | 2025030317 | bl616_fpga_partner_20kNano.sha256 |
| Primer 25K | BL616 | Click | 2025030317 | bl616_fpga_partner_25kDock.sha256 |
| Mega NEO | BL616 | Click | 2025030317 | bl616_fpga_partner_NeoDock.sha256 |
| Mega 138K Pro | BL616 | Click | 2025030317 | bl616_fpga_partner_138kproDock.sha256 |
| Console | BL616 | Click | 2025041420 | bl616_fpga_partner_Console.sha256 |
Troubleshooting
If you encounter any problems during use, or have any comments or suggestions on the document, please feel free to give us your feedback. Contact details are below.
In most cases, BouffaloLab's official documentation is sufficient for troubleshooting. Click here to get them.
Communication Methods
- Reddit : reddit.com/r/GowinFPGA/
- Telegram : t.me/sipeed
- Discussion forum: maixhub.com/discussion
- QQ discussion group: 834585530
- Leave a message directly below this page
- Business email : support@sipeed.com
FAQ
After updating the firmware, USB Converter A and USB Converter B do not appear, and only a single COM port is displayed.
- This may be caused by abnormal efuse content on the BL616. Please contact after-sales support for assistance with replacement-related services.
